The Complete Guide to Tuning VladBlad Irons Coil Tattoo Machines
A properly tuned tattoo machine is like a well-orchestrated instrument – it hums with precision and responds to your every movement. Whether you're a seasoned artist or just starting your journey, mastering the art of machine tuning is crucial for creating exceptional tattoos. This comprehensive guide will walk you through the process of tuning your VladBlad Irons coil machine to achieve optimal performance.
Understanding Your Machine's Voice
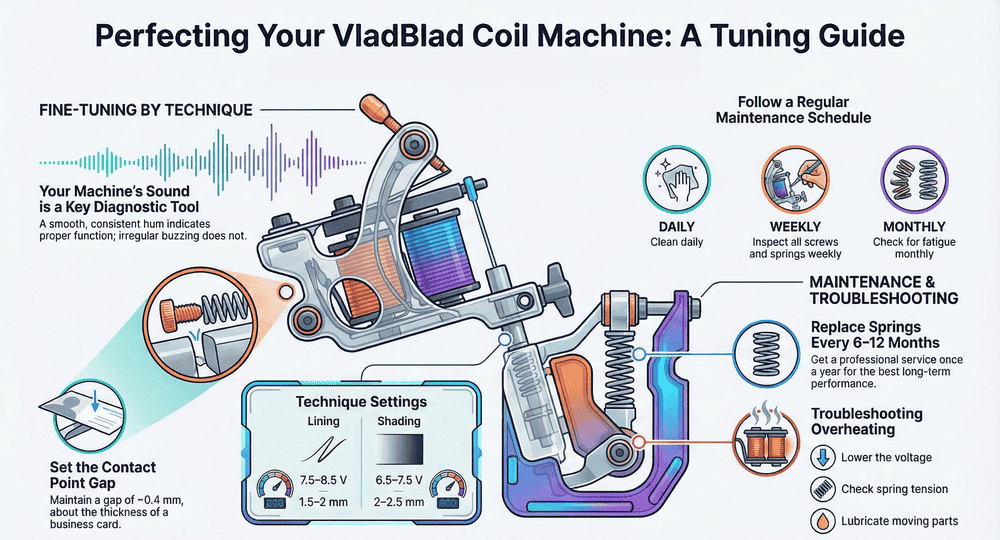
Before diving into the adjustment process, it's essential to recognize when your machine requires attention. A properly functioning tattoo machine produces a consistent, smooth humming sound. If you notice irregular buzzing, excessive vibration, or inconsistent needle strikes, these are clear indicators that tuning is necessary. Additionally, if you observe uneven line quality or experience difficulty achieving proper ink saturation, your machine likely needs adjustment.
Essential preparation starts with setting up your workspace with the right tools - a stable power supply with voltage control, cleaning supplies for initial inspection, and a white paper sheet for testing. The cleanliness of your machine directly affects its performance, so begin by carefully cleaning all contact points and checking for any loose components.
Initial Setup and Testing
Understanding the indicators of proper setup is crucial before making any adjustments. Your machine should demonstrate several key characteristics during testing. The needle bar must move in a straight, consistent path without any wobbling or deviation. When running, the sound should remain steady without fluctuation, regardless of the angle at which you hold the machine.
Testing against paper provides valuable feedback about your machine's performance. Run your machine across a test card – the marks should be consistent without skipping or dragging. This visual feedback helps identify potential issues with needle depth and timing. Pay attention to how the machine performs when held at different angles, as this can reveal problems with balance or spring tension.
Technical Setup and Fine-Tuning
The technical setup of your tattoo machine requires precision and understanding of how different parameters affect its performance. While many artists develop their preferred settings through experience, there are fundamental technical parameters that serve as a reliable starting point for achieving optimal performance.
Voltage and frequency work together to create the perfect balance for your tattooing style. For lining work, most VladBlad Irons machines perform optimally between 7.5 and 8.5 volts, producing a frequency of approximately 125 Hz. This combination provides the ideal needle movement for clean, precise lines. For shading, reducing the voltage to 6.5-7.5 volts creates a softer impact suitable for smooth gradients and saturated fills.
The contact point between your armature bar and front spring is crucial for consistent performance. When properly adjusted, the gap should be approximately the thickness of a standard business card (around 0.4mm). This spacing ensures reliable electrical contact while allowing smooth mechanical movement. The contact screw should be tightened just enough to maintain consistent operation without causing excessive wear on the contact point.
Amplitude and Power Control
The amplitude of your machine directly affects how the needle penetrates the skin. For optimal results with VladBlad Irons machines, aim for an amplitude of 1.5-2mm for lining work and 2-2.5mm for shading. The amplitude can be fine-tuned by adjusting the armature bar angle and contact screw position. A properly set amplitude will provide consistent ink deposition while minimizing trauma to the skin.
Your power supply plays a vital role in maintaining consistent performance. Modern digital power supplies offer precise voltage control, which is essential for maintaining optimal frequency. The relationship between voltage and performance follows a predictable pattern:
6.5V creates soft impacts suitable for delicate shading 7.5V provides balanced performance for general work 8.5V delivers maximum power for bold lines and heavy fills
When adjusting voltage, make changes in small increments of 0.2-0.3 volts to find your machine's sweet spot. Listen for a smooth, consistent hum without any stuttering or irregular sounds.
Spring Dynamics and Machine Balance
The interplay between your front and back springs significantly affects machine performance. Your front spring should be firm enough to provide quick needle return but not so tight that it causes excessive vibration. The back spring works in harmony with the front, providing stability and helping maintain consistent needle depth. Both springs should be checked regularly for proper tension and signs of wear.
Session Preparation and Monitoring
Before each tattooing session, follow a systematic check of your machine's condition and performance. Begin by testing the machine at operating voltage while listening for that consistent, characteristic sound. Verify that the armature bar moves smoothly without binding or hesitation. Check all screws for proper tightness – a loose screw can dramatically affect performance. Ensure all contact points are clean and free from any residue that might interfere with electrical conductivity.
During your session, stay attentive to your machine's performance. Monitor the temperature – excessive heat can indicate problems with voltage or friction. Listen for any changes in the operating sound that might signal the need for adjustment. Make minor voltage adjustments as needed when switching between different techniques, and periodically check needle stability, especially during longer sessions.
Technique-Specific Adjustments
For precise lining work, your machine should hit harder and faster. Increase the voltage slightly until you achieve a crisp, clear sound. The needle movement should be quick and decisive, providing enough force for clean, consistent lines.
Shading requires a softer touch with more controlled needle movement. Reduce the voltage slightly from your lining settings and adjust the contact screw for a smoother impact. The machine should produce a slightly lower-pitched hum compared to lining settings. This setup allows for better control during color packing and smooth gradients.
Comprehensive Maintenance Program
Regular maintenance ensures consistent performance and extends your machine's lifespan. Implement a structured maintenance schedule:
Daily Care: Clean your machine thoroughly after each use, paying special attention to ink residue around the armature bar and contact points. Wipe down all surfaces and ensure proper storage.
Weekly Maintenance: Examine all screws and connection points for proper tightness. Inspect springs for tension and positioning. Clean and lubricate the armature bar pivots if necessary.
Monthly Deep Service: Perform a complete disassembly and deep cleaning. During this process, carefully inspect:
- Contact points for signs of pitting or excessive wear
Springs for any indication of metal fatigue
Frame alignment and overall stability
All electrical connections and insulation integrity
Rubber band condition and tension
Troubleshooting and Problem Resolution
Understanding common issues and their solutions helps maintain optimal performance:
Machine Running Hot:
- First, check your voltage settings
Inspect for friction in the armature bar movement
Verify spring tension isn't excessive
Ensure proper lubrication of moving parts
Inconsistent Needle Strike:
- Check armature bar alignment
Verify contact screw adjustment
Inspect needle bar for smooth movement
Test rubber band tension
Excessive Vibration:
- Balance spring tension
Check for loose frame screws
Verify proper armature bar alignment
Inspect for worn contact points
Documentation and Settings Management
Maintain detailed records of your machine settings for different techniques and styles. Document:
- Voltage preferences for different techniques
Contact screw positions
Spring tension adjustments
Preferred needle configurations
Machine performance notes
This documentation becomes invaluable as you develop your artistic style and helps maintain consistency across sessions.
Professional Standards and Long-term Care
Store your machine in a clean, dry environment, preferably in a dedicated case. Replace springs every 6-12 months depending on usage, and inspect contact points monthly. Consider having your machine professionally serviced annually to ensure optimal performance.
Remember that a well-maintained and properly tuned machine is your most valuable tool. The time invested in understanding and caring for your equipment will be reflected in the quality of your work and the satisfaction of your clients. With proper care and attention to detail, your VladBlad Irons machine will remain a reliable partner in your artistic journey.
Leave a Comment